Decorative Metalwork Ideas For Welders!

Top Ornamental and Decorative Welding Projects:
Metal rods and strips can be creatively bent to create wonderful range of ornamental and decorative objects. The following post will walk you through some adventurous metal projects that cater to both beginners as well as seasoned welding hobbyists.
I also included one two surprise metalworking projects that might inspire you, so be sure to read all of them. Oh, and I'll be adding more in the near future. Please share your thoughts at the end in the comments area. Thank you for your time...
Preparatory Notes For Decorative Metal Projects:
To begin creating ornaments from metal strips and rods you'll need to equip yourself with the following...
The following is a list of tools you'll need and it's not the entire list (you'll get more tools as you move along with your projects):
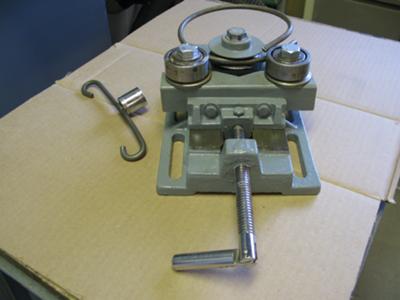
- Rod (metal) Bender or Roller. Pictured here is a homemade rod roller by by Joe Schimka.
- Forming jigs (a curve or scroll jig will prove essential in making the process a lot easier).
- Chop Saw or Grinder.
- Arc Welder or MIG Welder.
- Safety Equipment (mask, safety goggles, gloves, fire extinguisher, first aid etc).
- Welding Table.
- Welding Tools Cart.
- Clamps.
You can get a more intuitive grasp of using the jigs if you were to first practice making basic shapes using the metal rods/strips. Once you have a good grasp of using the jigs, you can get creative and make shapes of your own design and gain an intuitive understanding of how the metal rod/strip will respond to your efforts on the jig.
Too many welds make the ornament lose its natural touch as well as make it less sturdy. The number of welds can be reduced if each section is made using fewer parts. This will prove extremely useful when welding ornamental railings that require bending longer rod/strips into different shapes. To ease your learning curve, we will start from welding together simpler objects and gradually move towards more demanding projects.

Small Decorative Metal Welding Project Ideas For Your Interior.
Wrought Iron Stand:
This project may require only two pieces of metal rods yet it will test how well you can loop the rod on both ends. The tricky part of the project is to create a compound loop while maintaining the smooth curvilinear shape of the rod as it is being bent from both ends.
You’ll observe that the pillar (part that is rising) has two disproportional loops- one is tightly looped compared to the second. Bending the first loop will be simple, but as you try to loop the other end, chances are that you’ll create a “hump” in the middle. Straightening the hump can easily disfigure the shape.
The trick is to start from the end that will require a narrower loop instead. This will give you a greater length of “straight” rod in the middle and hence more leverage. This will prevent any unnecessary mounds from developing in the middle as the leverage will consistently be supplied by the linear region of the rod.
Use the scroll jig to bend the rod into a circular shape. Weld the section without beveling the bead. When both the sections are created then the protruding bead on the circular base will be used to hot weld the pillar. This will create a stronger weld as well as prevent the two welds from becoming visible.

Wall Pot Holder:
Small wall pots add a natural touch to rooms with a healthy amount of sunlight. This project once again will test your skills to loop a metallic rod. The project can be divided four distinct sections. These include a circular holder for the pot, and three compound looped rods.
For this project you should start with creating the central “s” followed by the two outer loops. While creating the outer loops, first create both the end loops. Next create the curvature in the middle by creating leverage from the other end instead of the middle. This lets you arc the middle section to easily encompass the central “s”. If you were to create the curvature using the linear middle, then you are likely to create a pronounced semi circle instead of a smooth arch.
Once you are through making this project, perhaps you’d like to center a metallic heart into your designs?

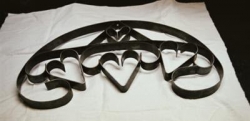
Hearty Pot Holder
As can be seen, this decorative pot holder utilizes the shapes that you have already created with the addition of a metallic heart- which might prove tricky. Bending loops on such a small length will prove difficult; bending from the middle even more so.
The trick to creating a small heart shape is to create end loops normally and then using scroll jig to lightly hammer-bend the slight arch.
Let's get to some more advanced projects using similar techniques but on a much grander scale.

Ornamental Sleigh!
Using Metal Strips:
This ornamental sleigh is made using 4 different sets of loops and five sections.
Start by making the central rectangular “table” that will connect the two side runners and hence make the bottom sled. This section will require two looped arcs of metal strip, two “L-shaped” metal rods, and two straight metallic rods. Slightly bend the “L-shaped” rods so that the two sides are not perpendicular to one another. Weld one straight rod to the insides of the “L-shaped” rods. Weld the two arched loops to either end of the second metallic rod. Weld this section to the “L-shaped” rods to have a fancy looking table. This will be welded to the two side runners.
To make the side runners you need two “S-loops” and two compound loops (see picture). Weld the “S-loops” to the center of the longer compound loop. Weld the runners to the “table” created earlier to make the bottom sled.
The final section is the sled’s handle and its side arms. Each side of this section will need an elongated “S-loop” and an arched compound loop. Weld the “S-loops” to the center of the arched loops. Weld each side to bottom sled to complete your ornamental sleigh.

Large Interior Decorative Welding Project Ideas:
Wrought Iron Railing:
A railing normally has a pattern that repeats throughout its length. Once you get the hang of this primary pattern, you can re-create it as many times as is required to cover the length for your railing.
This railing has 2 sections requiring a set of 2 different arched loops and 2 metal rods. To make each section, make an “S-shaped” compound loop and a smaller arched loop. Weld the smaller arched loop at the center of the “S-shaped” loop. Weld the larger end of the “S-shaped” compound loop to the metal rod. This makes the first section of the pattern. Repeat to make the second section.
Arrange the sections as shown in the picture and weld the ends and the center. Now you will have the first complete pattern for your railing. Measure the length of your railing and find the number of patterns you need to weld together and you are on your way to creating your hand welding ornamental railing.
Welding and Metalwork Video Guides:


Decorative Metal Chandalier!
This unique metalwork project took a long time for Debbie Parsons of Wonderland Welding to complete, but it's a beauty. For this project you will need sheet metal, chain, quarter inch round bar, and electrical.
The tools to complete the job include your welder, a plasma cutter (otherwise it will take forever), and a drill press plus other basic tools you have around the shop.
The first one she made it took her 30 hours. This is so unique and awesome I wanted to share it with you.

Small Ornamental Welding Project Ideas for Your Exterior!
Pot Holder:
Building this pot holder will require a certain amount of finesse and skill on your part. As you can see from the picture, there are many loops in this holder, making this will require a seven step procedure.
You can start by creating the outer lop and move onto creating the semi circles using the curved jig. After creating the eight semi circles, create a smaller circle to serve as the holder. Connect the smaller circle to the larger with the help of an arc. The 8 semi circles are to be connected at the center within the larger circle with the help of the welder.
Connect the metallic hollow tubing to the center. By this point you should have a semi-functional pot holder. Create two smaller circles and their internal semi circles and connect them to the pot holder with the help of the tubing. Connect the smaller circles to each other with another rod, and compare your creation to the picture.
This can easily be created using either only metal strips or a variation of metal strips and metal rods

Tri-Cycle Pot Holder
Building this pot holder will require a certain amount of finesse and skill on your part. As you can see from the picture, there are many loops in this holder, making this will require a seven step procedure.
You can start by creating the outer lop and move onto creating the semi circles using the curved jig. After creating the eight semi circles, create a smaller circle to serve as the holder. Connect the smaller circle to the larger with the help of an arc.
The 8 semi circles are to be connected at the center within the larger circle with the help of the welder. Connect the metallic hollow tubing to the center. By this point you should have a semi-functional pot holder.
Create two smaller circles and their internal semi circles and connect them to the pot holder with the help of the tubing. Connect the smaller circles to each other with another rod, and compare your creation to the picture.

Garden Arbor:
A garden arbor is a relatively easy project but will make your garden instantly more visually appealing. Why buy a boring poorly made one at Homedepot when you can just buy the raw materials and build an amazing one in hours.
Use some tools to bend the metal the way you want your artwork to look, weld the them into your simple arbor, and you are done. It will take some work but it's quite simple to do. Heck, you could even sell your design locally!
The garden arbor entrance piece pictured was created using a very effective bending tools. Without them it would take you hours to make the proper bends. But with jigs your bends are made in seconds, and just they way you want them.

Large Exterior Decortive Metalwork Project Ideas!
Garden Table Or Bench!
How many times have you seen a garden table and chairs, or a garden bench that looked nice but then it felt like it was going to break after you sat in it for a while. Well, once again you can buy the materials yourself and build a better, more beautiful design using simple tools.
A garden bench is much easier to build and you can get plans and designs in many different books (see below). Or you can draw it out yourself, go to your local supply store and get the materials.
The bench pictured here is a great design but you can easily ad decorative work to the legs, and replace the wood with metal if you like. There's all kinds of options with this design.
Decorative welding and metalwork is so much fun, and it's even more rewarding. After you make a few pieces for your home and show them off to some people, and maybe include them on social media (Facebook), you will see interest begin to snowball and you might be in business in spite of yourself.
Or just have fun doing it :-)


