A Guide To Stretching and Shrinking Metal!

Stretching Metal:
Stretching metal serves two purposes: It thins the metal, allowing you to work with a more flexible piece, and it curves the metal for your work project.
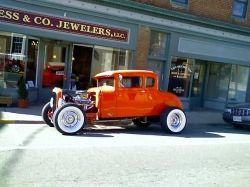
Sheet metal is the most common type of metal that is stretched for custom projects like the hot rod pictured here.
Examples of curved metal projects are the window frames and quarter panels for automobiles, custom motorcycle tank, and even metal jewelry, and metal bowls. In other words, there are a multitude of items, from the delicacy of crafting gold and silver, to automotive and architectural design.
Tools and Stretching and Shrinking Metal:
There are various techniques for metal stretching that include:
- Hand tools: Hammers - Slappers and Claw Hammers.
- Bending machines.
- Stretch forming press.
- English Wheels and Planishing Hammers.
- Rollers.
- Torches (for heating metal).
- And more.

The Basics:
When stretching metal, you should always be careful not to stretch it too much, or you'll have a weaker material for your project.
When working with stretch forming, you are typically using a large piece of metal that you want simultaneously stretched and bent to form a large, contoured part. Automobile panels and the panels for airplane wings are examples of working with large, stretched metal sheets.
Ductile metals, such as aluminum, titanium and steel are the most desirable materials to use for stretch forming.

Hammering:
Many metal workers begin their metal stretching projects by hammering the piece first. This is done by placing the cut piece of metal over an anvil or a forming head, and repeatedly delivering hammer blows with a hammer or slapper.
The image here is the legendary metalshaper Ron Founier showing us his forming head as well as other metalworking tools for proper blocking and smoothing technique.
This forms a series of large bumps, while the metal becomes increasingly thinner with the blows. To begin stretching out the bumps, you switch to a wooden mallet. Some workers prefer to wrap their mallets in leather as the metal then offers less resistance. As the piece stretches, you'll want to switch to a smaller, lighter hammer. In the final stage, a metal shaping tool can finish out your work to a smooth, contoured surface.
Jewelers also used specialized hammers and anvils for stretching and shaping metals. Typically, they keep several sizes on hand for the exacting work of stretching and shaping fine metals, such as gold and silver.

Rolling Machines:
Metal is commonly stretched through the use of rolling machines. The rolling machine has a fixed anvil and an upper wheel. When the metal is placed down on the anvil, the upper wheel is clamped over the top to curve and stretch the metal.
The roller pictured here is a Tin Knocker which can be found at ToolPlanet.com...
The pressure of the wheel rotating against the metal, causes it to flatten and form a curve. Metal rolling machines can be hand or foot operated. Hand controlled devices are good for small projects, but for larger ones, a foot operated rolling machine is best. If you are using a hand operated rolling machine for a large or fairly large project, it's best to have an assistant as it's desirable to have both hands free for operating the machine. The English wheel is an example of a rolling machine.
Mass produced metal stretching is done by stampers, a technique that involves hydraulic pressure over a fixed item. A guide holds the item in place, while a movable stamp is forced down on the metal from above.

Thinning and Curving:
Basically, the process of stretching metal involves pressing the metal to thin it or pulling it until it forms a curve. The techniques for stretching metal vary greatly, depending on the type of project and the metal you wish to stretch.
Metal stretching can also be used to repair curved metal pieces, such as car bumpers and curved metal window frames. Before stretching a metal piece, it is desirable to measure and mark the areas you want stretched for accuracy in your project. There are a wide assortment of items that can be shaped through metal stretching, including recycling old metal pieces into new projects.
Metal Shrinking:
Curving metal involves both stretching and shrinking it. The outward curve has stretched, while the inside curve is smaller. Understanding this will help you understand the underlying principle behind metal shrinking.
There are two common methods of shrinking metal; cold shrinking and hot shrinking. Cold metal shrinking is usually done with shrinking dollies, and an offset hammer. When you are cold-shrinking metal, you do not strike directly down, but strike an a slight angle, so the metal you wish to shrink begins piling together and forming to fit the concave of the dolly.
Cold Shrink Method:
The cold shrink method can also be used for forming a concave shape in your metal piece by creating pleats and folds in the area you want to shrink. While hammering the piece, you shrink the metal in the pleated areas while stretching it in others.
It is recommended that when working with aluminum, you should always cold shrink it. There is no difference between the methods used for cold-shrinking aluminum and cold-shrinking steel.

Heat Shrinking
Heat-shrinking is often used for removing dents and metal body repair. It might also be used for large panel projects. Deciding whether to heat shrink involves several considerations. For large projects and major auto body repair, you might decide that heat shrinking is necessary.
You might decide to heat shrink dents if the inner construction of the project you wish to repair prohibits normal hammering.
Heat shrinking aids in reducing the size of the dent, allowing effective repair work without unnecessary stretching and thinning of the damaged area. Heat shrinking may be the most effective means of repair when it becomes necessary to remove some or all the surrounding parts to cold shrink a damaged area.

Small Dents:
Heat-shrinking small dents is a simple procedure. It involves using a torch at a relatively high heat, adjusted to a neutral frame. Be sure to point the tip of your torch directly down at the spot and not at an angle.
Remove your flame immediately once the metal begins rising within the heated area. Before the metal begins to cool down completely, use a body file to smooth the heated spot. Heat shrinking dents may seem puzzling as the logical conclusion is that metal expands when it is heated. However, as the spot heated metal comes into contact with the surrounding cold metal, it begins to contract, creating a small pool that quickly hardens.
A similar technique is used for large-surface repair work. Spoons dollies are used with a shape or crown slightly smaller than the shape of the panel you want to shrink. Do not choose a dolly or spoon with a crown greater than the size of the panel you wish to shrink or you will stretch the metal. Use a flat hammer with rounded edges.
Dent Repair Techniques:
Study the panel you are working on until you find the highest point of damage. This is where you will begin shrinking first. Your hammer strikes should fold the metal into the desired area for shrinking. Use the same torch tip size for shrinking the panel as you would for welding the same material.
Heat the panel evenly by holding the torch perpendicular to the area you want to shrink. As the metal heats, a small soft spot will form in the center of the area. This will allow you to begin compressing metal toward the center. As the heated spot cools, it contracts. The heated stretched metal surrounding the spot will also begin contracting.
Conclusion:
Each heated shrink must be done separately. You can cool the treated area by wiping it down with a cool, wet rag, or with cool air flow, but you must allow the metal to cool completely before beginning to shrink another area. Cooling the metal down with a wet rag will increase contraction and allow you to complete your project more quickly.
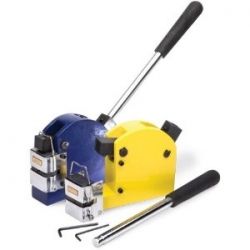
Shrinker Stretcher Combo
Highly Recommended!
The Shrinker Stretcher Combo by Eastwood can get to work on mild steel (18 gauge) and aluminum (16 gauge).
This Shrinker Stretcher set features a cast iron chassis (or frame) that is heavy duty. The great thing about this economical but high quality set is that is is simple to use, making this a killer buy at around $200. Usually it costs $200 or more per stretcher or shrinker, but you get them both for that price. Jump on it while you can.


