Welding Tools For The Beginner!

Basic Welding Tools You'll Need To Get Started Welding and More!
If you are just starting out welding and don't know what welding gear to get, and you want to weld fun and simple welding projects around your home, or if you want to make some money doing it, this is going to be the best article you read.
I remember when I first wanted to weld I went on all the forums, read articles, looked at tools and welding machines, and I just felt overwhelmed.
There are so many different types of welding machines and welding processes, and on top of that there's a mountain of different welding tools and accessories you can buy.
So where does the beginner welding begin? Let me show you...
What Kind Welding Should I Do For Beginner and Intermediate Projects?
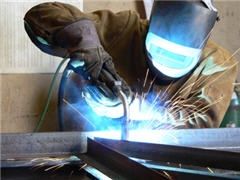
Without a doubt, the MIG welding process is what you need to be doing first. So you'll need a MIG welder. Don't get caught up in all the different kinds of welders and welding processes like Flux Core, Stick, Tig, Oxy Acetylene, etc. etc. A MIG welding machine is all you need to start. And it may be the only machine you'll ever need.
MIG Welding Basics:
When you buy a MIG welding machine it's basically just a wire feed welder (flux core) until you use it with shielding gas. Once you connect the shielding gas to your MIG wire feed welder you now have a MIG welder.
Why Use Gas? When you weld without 'shielding gas' (a mixture of both argon and carbon dioxide), oxygen from the air gets into your weld and causes spatter. That's why we use shielding gas - to shield the weld from oxygen and other impurities in the air. This makes you weld smoother and with less spatter.
MIG welding is a fairly versatile welding process and it's ideal for the beginner because the wire is constantly and automatically being fed while you weld and you only need to use one hand.
Other welding processes like Stick and TIG welding require two hands. However, TIG welding is much more versatile in terms of the types of metals you can weld and it's ideal of tough welds like S curves and welding around tubing. TIG welding is more advanced and not recommended for beginners.
However, MIG is a just find for what we want to do. You can literally start welding instantly!
Side Bar: Be sure you read your MIG welding instructions carefully and do exactly what they say. You'll want to pay close attention to the how much heat you'll need and fast you want the wire to feed depending on the thickness of the steel you are welding.
Basically, the thicker the material you weld the hotter you'll need to set your machine at, and the faster you want your wire to feed. Do not buy a used MIG welder without an owners manual.

The Most Important Welding Tool: The MIG Welder!
This is the most important tool so invest in a quality machine.
There are many domestic and overseas manufacturers of MIG welders. There are good ones made here in the USA, as well as overseas. Some domestic companies like Eastwood sell and service MIG welders here in the USA but their welders and manufactured in China.
Stick with the name brand welders, and buy a new one. You may be able to find a used welder on craigslist but I don't recommend it. Some people don't' take care of their equipment, let it bang around in their trucks and SUV's, or leave it out in the elements. Plus, it may not have one with the owners manual. Simply put you may buy a headache. Invest in a good machine. The other tools aren't as expensive and you can replace them quite easily.
So which MIG welder should you get?
If you are going to be welding from a household power outlet get one of the Lincoln or Miller welders below. They will run just fine from your household outlet (110v or 120v). I prefer the Miller 140 but that's just my preference. Lincoln makes great welders as well.

Second Most Important Welding Tool - The Angle Grinder!
An angle grinder is going to be one of your best buddies in the shop as you build your projects. An angle grinder is versatile. You'll use it to grind off rust, paint, and debris from you metal. If you get metal at a scrap yard you'll be doing this a lot.
The other use you'll want to use it for is finishing, etching, and polishing your final project. You can make some really cool looking designs in seconds with the grinding disc.
The most common angle grinder use will be to clean your metal of debris for MIG welding. But another way you'll use your angle grinder is to cut metal. A band saw is best for cutting rod and steel but this works great if you don't have one. Simply put on your cutoff wheel, and it's read to 'cut off'. Since one of my favorite easy welding projects is go make garden stakes, you can use this to cut the rod to length this way.
Those are just two useful ways you'll use your grinder. But there are other artistic uses as well, like polishing your steel to make it beautiful and shiny, or etching with the grinding disc.
Attention: An angle grinder can be very dangerous so read the user manual and operate it with care. You can get hurt real fast with one of these. Secondly, get ear protection (it's loud), a face shield (protect your eyes and face from flying debris), and gloves.
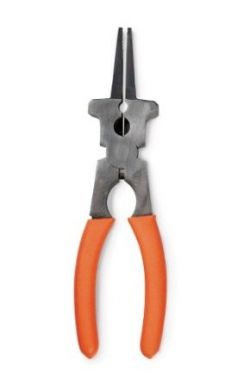
5 Essential Welding Hand Tools!
MIG Needle Nose Pliers: Needle nose pliers in general are handy for all types of situations. But a specialty set of MIG needle nose pliers is what you need because as you weld you'll get build up on the nozzle, and these specialty pliers will make it easier to get that stuff out. In addition you have the wire cutting feature which you'll need when you extend the wire out of the nozzle to far. You'll need to cut it to the right length before welding. You could probably get away with a regular set of needle nose pliers but they are not as easy to use as these specialty pliers.
Clamps: These are very important because you don't want things moving around as you work. You'll also want to keep things in place when you start to mock up your design and tack weld. You can never have too many clamps.
Vise: You'll want a bench top vice because you'll need something that will hold your metal as you weld or grind your material. You will also use this to bend rod for your different welding art designs.
Wrench: You'll need a wrench for many different reasons as you work on your projects. From working with your welding machine to taking nuts and bolts off material and on your projects, etc. etc.
Ruler: You must have a right angle ruler because getting your angles right on your projects will prove to be essential. For example, if you build a welding table you'll need to get the legs at the 'right angle'.

Welding Table:
You need a flat, sturdy surface to weld on and it will be made of metal. You can build one yourself. There's plenty of plans on the market for a good one. But if you are just starting out you may want to buy one and put it together, or look for a used on on craigslist.com
A welding table is essential because you are going to be working with different pieces of steel, tools, and you'll be clamping them here and there on the table.
Do not ever weld on a wood surface or near one!
The welding table in this image was built by Joe Grisafi, a subscriber and contributor to WcWelding.com.
I like the starter welding table below because you'll have a small welding table ready to weld on as you build or look for a larger one. It's also mobile so you can fold it and go...

Essential Welding Gear: What You Should Wear!
Welding Helmet: Get a good quality auto-darkening welding helmet. The reason you want a welding helmet with an auto darkening lens is because you will want to see what is going on as you weld and you can look at the weld without a special lens otherwise you will severely damage your eyes. A good auto darkening welding helmet is not expensive anymore (unless you buy the state of the art ones, which you don't need).
Full Face Protective Shield: You must wear face and eye protection as you grind or use other tools like the drill press.
Safety Glasses: These are specifically made to protect your eyes and are a good alternative to the full face mask if that makes you uncomfortable.
Mask: A good dust mask is ideal for when you are cleaning debris from your metal (like when you are using the angle grinder).
Gloves: You must have gloves when you are welding and using the angle grinder. They will provide much needed protection as you weld (and when you are temped to handle the metal right after you weld, which will be hot - wait for it to cool!)
Types of Clothing: Do not wear polyester! It catches fire. Wear clothing made of cotton or leather. Better yet, wear a welding shirt like this one.
Boots: You need steel toe boots and a protective covering of the laces if possible. The reason is that material drops and spatters and it's hot. It will burn your laces. Wear pants over your boots so that it does not fly down into your boots. You'll see some welders wearing short sleeves, no gloves, and regular shoes. You'll see them on TV. They are idiots!

Welding Tools You'll Want Soon: Bigger Shop Tools.
These are not essential when you start but you'll need and want them fairly soon...
Band Saw: A band saw is great for cutting all types of metal for your projects and frankly it's safer compared to using an angle grinder. If you start working with thicker material you might be temped to use your angle grinder but using a band saw is really the way to go.
Drill Press: This is a tool you should soon after you complete several projects. A drill press will cut holes in your material easily and safer than a hand held drill. A drill press is handy for all kinds of projects.
Jig: A jig is basically a tool that you create to help you complete projects faster by keeping all the parts in place prior to welding them together. You will need a Jig very soon because you'll find that holding things together on the table only works for certain kinds of projects. For example, if you build a small garden table or chair you will need to hold the legs up. A jig will do this for you so that you can focus on welding the parts together.
The image below is of Ron Covell using a JIG to hold together a motorcycle frame...
Ron Covell and His Chopper Frame Jig:

Helpful Welding Supplies and Tools:
You Don't Need These Tools and Supplies Right Away But They Sure Are Helpful!
Right Angle Clamp:
Welding perfect right angles will be important for many of your upcoming projects. And you can simply use a right angle ruler, but this angle clamp is ideal for some of these angle 'situations'.

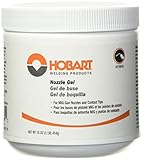
MIG Nozzle Gel:
Not a totally essential tool or supply but it will keep your frustration levels down and keep you more productive.
You'll Have Occasions To Chipping Away and Brush:
A chipping hammer and wire brush is handy when a grinder is not appropriate.

Welding Cart Makes Your Welder Mobile:
Sometimes your hose isn't long enough or it's too dangerous to stretch it out. Or maybe you just want to move your MIG welder in the right spot. A welding cart is ideal. You'll want this eventually.


 with a table router.")


